

Marker And Colored Pencil Drawing
Using markers as an "underpainting" adds depth to a colored pencil portrait.
By Anna Hammer

I considered myself a mixed media artist, but only colored pencils stay on my desk permanently. I combine them with various media (like markers) depending on the project and, in turn, I'm able to achieve richer results than I could with colored pencil alone.
The Perfect Formula
I'm the artist continually looking for the perfect formula in drawings. At first I was using gouache to cover flat areas; later, I experimented with oil sticks, watercolor, ink, airbrushes and even oil paint.
This process of finding a mixed media formula began when I started a new series of drawings called No Evil. At the time, the works of Michael Parkes fascinated me. I loved the seamless gradients and transparency of his drawings. To get a similar look, I used the Copic Airbrush System, which allows artists to airbrush with markers, and this created a different effect than I'd expected. I decided to continue with this process throughout my series. Some of my works are done almost entirely with markers: I had found the elusive partner I'd been looking for to accompany colored pencils!

Copic markers are transparent. They blend smoothly, and they come in more than 300 colors. I learned how to blend the colors to create skin tones, and I lay them as a wash under colored pencils. For larger areas, mostly in my backgrounds, I use Chartpak Ad or Copic Wide markers.
Demo: Layering Marker Under Colored Pencil
Materials
- Surface: Arches Art Board (hot-pressed)
- Media: Prismacolor pencils, Copic Sketch and Wide markers, Chartpak Ad markers, Tombow markers, Copic Opaque White paint
- Other: Copic Airbrush System

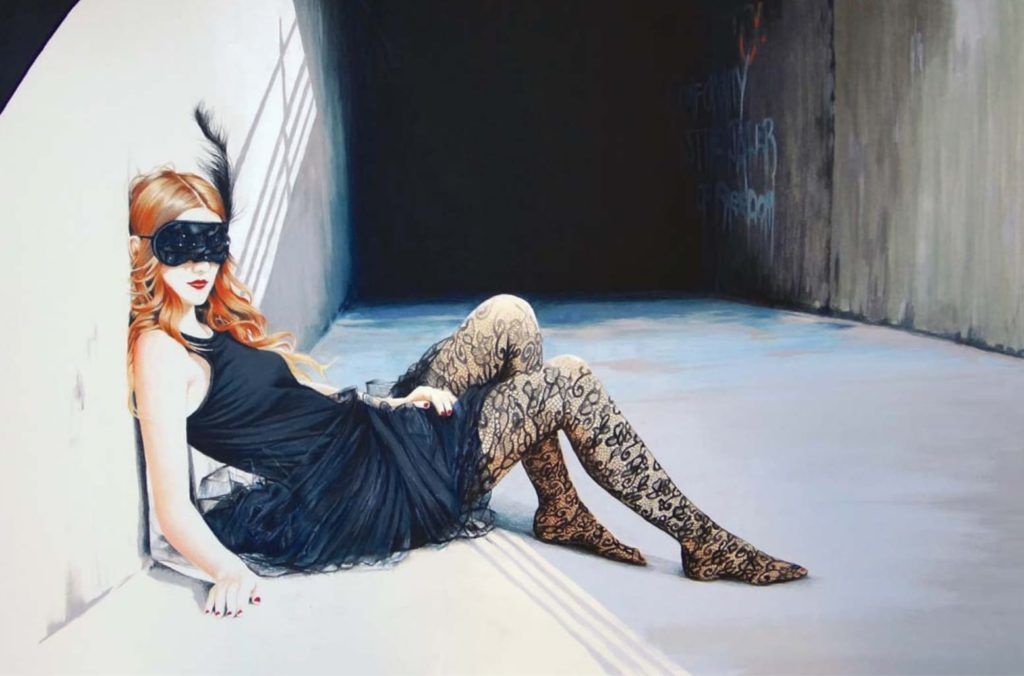
1. Transfer drawing and layer skin tone.
First, I transfer my drawing using a sharp colored pencil in gray. I don't use graphite because markers and colored pencils don't combine well with graphite. Then, I immediately start putting down skin tones over the drawing with the brush nib attachment from Copic Sketch. I spray the marker's ink in a "sweeping" motion, layering from the lightest shade up to the darker colors as I begin blending. I use about five shades in total.

2. Fill in large areas of color.
Next, I fill in the subject's hair, leaving space for where the highlights will be, and I cover the background with Copic Wide in Cool Grey. I go over the background shading a few more times for added intensity in areas where I want the background to be darker.

3. Add texture.
Now I'm ready to introduce the colored pencils. I slowly layer colors on the subject's face, moving outward toward her hair. I work on her coat using a Tombow Dual Brush Pen with two shades of gray. These markers give that "plush" effect, and I use them often when I create drawings for designers and fashion labels.
To create the graffiti, I use Copic Wide and Chartpak in Dark Grey. I'm not very accurate with the strokes at this point. I'm still establishing my dark values and letting the transpar- ency show. I'll add details later with colored pencils.

4. Focus on details.
Now I'm concen- trating on the coat, building pencil lay- ers of Cool Grey and using a range of pressure on the pencil tip from about 10 to 90 percent. I also use different shades of gray for the background, marking little cracks in the concrete wall and focusing on more details.

5. Perfect blending.
Next, I add some bold reddish brown strokes to the subject's hair using very sharp pencils in Terra Cotta and Tuscan Red. Then, with a black pencil, I bring all the colors together by blending them into a more cohesive color.

6. Make finishing touches.
At this point I take a good look at the artwork to determine what areas need special attention. I decide to add highlights to certain areas of the subject's face and the collar of her coat with just a tiny amount of Copic Opaque White paint. I also add some gold strokes to the background. Finally, I grab a Copic Wide in Light Cool Grey and add a few horizontal strokes to the wall.
About the Artist
Anna Hammer is a commercial illustrator and artist. She works mainly in colored pencil and marker. Fun Fact:Entertainment Weekly commissioned Hammer to create portrait illustrations of the Kardashian family members for the reality TV show, Keeping Up with the Kardashians.
Marker And Colored Pencil Drawing
Source: https://www.artistsnetwork.com/art-mediums/mixed-media/creating-drama-with-pencils-and-markers-a-demo/
Posted by: clemensupout1943.blogspot.com
0 Response to "Marker And Colored Pencil Drawing"
Post a Comment